
The aim of this exercise is:
The exercise contains three different parts: Synchronization, Buttons, and Producers - Consumers. The first two parts, Synchronization and Buttons, are most important. The students who have not taken the Real-Time Programming course should also do Producers - Consumers.
In order to avoid class name conflicts we recommend that you create one subdirectory for each of the three main parts of this exercise: Synchronization, Buttons, and Producers - Consumers.
Synchronization and mutual exclusion are important when multiple threads access external units or shared variables. In Java mutual exclusion is primarily achieved by declaring methods as synchronized or by using synchronized blocks within methods.
Consider the following code example:
  public class Wrong extends Thread {
    private volatile int ti = 0;

    public void run() {
      int e;
      int u;
      int loops = 0;

      setPriority(4);

      try {
        e = 10;
        while (!Thread.interrupted()) {
          if (ti != 0) {
            u = e / ti;
          } else {
            u = 0;
          }
          loops++;
        }
      } catch (Exception ex) {
        System.out.println("Terminated after " + loops +
                           " iterations with " + ex);
        System.exit(1);
      }
    }

    public void setTi(int ti) {
      this.ti = ti;
    }

    public static void main(String[] args) {
      Wrong w1 = new Wrong();
      w1.start();
      int i = 0;
      try {
        while (!Thread.interrupted()) {
          w1.setTi(0);
          Thread.sleep(1);
          w1.setTi(2);
          Thread.sleep(1);
          i++;
          if (i > 100) {
            System.out.println("Main thread is alive");
            i = 0;
          }
        }
      } catch (InterruptedException e) {
        // Requested to stop
      }
      System.out.println("Thread stopped.");
    }
  }
Notice that the problems do not occur until after a while. This is due to the event-driven nature of concurrent real-time systems and one important reason why it is difficult to verify the correctness of real-time programs by testing alone.
The volatile keyword tells the compiler that the variable is manipulated by multiple threads and that once the variable has been written it is flushed out of the cache to main memory, so that it immediately becomes visible to other threads. It also prevents the compiler from allocating the variable in a register instead of in main memory. If the keyword is removed (try it) the above example might not work as intended.
Note: It is unspecified and thus up to the Java Virtual Machine (JVM) what happens without volatile. The JVM may cache it, not cache it, or even cache it after executing for a while.
public class WrongWithSynchronization extends Thread {
	private volatile int ti = 0;

	public void run() {
		int e;
		int u;
		int loops = 0;

		setPriority(4);

		try {
			e = 10;
			while (!Thread.interrupted()) {
				synchronized (this) {
					if (ti != 0) {
						u = e / ti;
					} else {
						u = 0;
					}
				}
				loops++;
			}
		} catch (Exception ex) {
			System.out.println("Terminated after " + loops + " iterations with " + ex);
			System.exit(1);
		}
	}

	public synchronized void setTi(int newTi) {
		ti = newTi;
	}

	public static void main(String[] args) {
		WrongWithSynchronization w1 = new WrongWithSynchronization();
		w1.start();
		int i = 0;
		try {
			while (!Thread.interrupted()) {
				w1.setTi(0);
				Thread.sleep(1);
				w1.setTi(2);
				Thread.sleep(1);
				i++;
				if (i > 100) {
					System.out.println("Main thread is alive");
					i = 0;
				}
			}
		} catch (InterruptedException e) {
			// Requested to stop
		}
		System.out.println("Thread stopped.");
	}
}
The operations that involve checking ti!=0, and using this result,
need to be synchronized as well, to avoid the problem above.
However, if the entire run() method is synchronized, it takes too much
time to execute without letting other threads proceed.
As a general rule of thumb you should always use synchronization to protect accesses to shared variables, also in the case when you are quite sure that the access operations are atomic. The reason is that although the operations are atomic, the memory management model within the JVM in certain situations does not guarantee that the writing to the physical memory occurs in the same order as the order in which the changes take place. This may give confusing results.
Consider again the class Periodic from Exercise 1. (Available here). It should now be modified to make sure that the output from multiple periodic threads is not mingled on the screen. You only need to make sure that the print statements are treated as a critical section. The question here is what you should synchronize on.
The best approach is to introduce a new class, Screen, with a single synchronized method
public synchronized void writePeriod(int p);
that the periodic threads call instead of writing directly to the screen.
public class Screen {
	public synchronized void writePeriod(int p) {
		System.out.print(p);
		System.out.print(", ");
	}
}
public class PeriodicWithScreen extends Thread {
	private int period;
	private Screen screen;

	public PeriodicWithScreen(int period, Screen screen) {
		this.period = period;
		this.screen = screen;
	}

	public void run() {
		// Uncomment to print default priority
		//System.out.println("Priority = " + getPriority());

		// Uncomment to set priority
		//setPriority(getPriority() + 1);

		try {
			while (!Thread.interrupted()) {
				screen.writePeriod(period);
				Thread.sleep(period);
			}
		} catch (InterruptedException e) {
			// Requested to stop
		}
		System.out.println("Thread stopped.");
	}

	public static void main(String[] args) {
		Screen screen = new Screen();
		for (String arg : args) {
			PeriodicWithScreen p = new PeriodicWithScreen(Integer.parseInt(arg), screen);
			p.start();
		}

		// Uncomment to print the number of active threads.
		//System.out.println(Thread.activeCount());
	}
}
Another approach is to use a static object within Periodic as a lock. Since the lock is static it will be shared between all instances of Periodic. This solution is used in PeriodicStaticLock. Make sure that you understand this code.
Another possibility is to instead synchronize directly on the class lock of Periodic. The class lock is the lock that is acquired when a synchronized static method executes. The class lock is a distinct lock that is different from all instance locks. It is possible to have a block of code synchronized on the class lock using the following notation
    synchronized (this.getClass()) {
      ...
    }
A common way to achieve mutual exclusion is to use semaphores. Semaphores did not become part of Java until Java 1.5, and then only in the java.util.concurrent package. However, also before that the functionality could easily be implemented using synchronization. The class se.lth.control.realtime.Semaphore implements a standard counting semaphore. Study the Java documentation for the class.
import se.lth.control.realtime.Semaphore;

public class WrongWithSemaphore extends Thread {
	private volatile int ti = 0;
	private Semaphore mutex;

	public WrongWithSemaphore() {
		mutex = new Semaphore(1);
	}

	public void run() {
		int e;
		int u;
		int loops = 0;

		setPriority(4);

		try {
			e = 10;
			while (!Thread.interrupted()) {
				mutex.take();
				if (ti != 0) {
					u = e / ti;
				} else {
					u = 0;
				}
				mutex.give();
				loops++;
			}
		} catch (Exception ex) {
			System.out.println("Terminated after " + loops + " iterations with " + ex);
			System.exit(1);
		}
	}

	public void setTi(int newTi) {
		mutex.take();
		ti = newTi;
		mutex.give();
	}

	public static void main(String[] args) {
		WrongWithSemaphore w1 = new WrongWithSemaphore();
		w1.start();
		int i = 0;
		try {
			while (!Thread.interrupted()) {
				w1.setTi(0);
				Thread.sleep(1);
				w1.setTi(2);
				Thread.sleep(1);
				i++;
				if (i > 100) {
					System.out.println("Main thread is alive");
					i = 0;
				}
			}
		} catch (InterruptedException e) {
			// Requested to stop
		}
		System.out.println("Thread stopped.");
	}
}
A drawback with semaphores compared to synchronized method is that it is easy to forget to do a take() or give(). The compiler gives no debugging support regarding this. An advantage is that it is possible to provide mutual exclusion for scopes that are larger than the scope of a single method.
Note! It is highly recommended to read through the entire exercise before starting with any implementation. Further down you will be given code skeletons to use.
As an exercise in real-time programming the following problem should be solved. The level in a tank should be controlled with a proportional controller. A suitable sampling interval for the controller is 0.1 seconds.
The reference signal is a square-wave with a period of 20 seconds. This should be generated internally in the program. With a set of increase and decrease buttons it should be possible to change the square-wave signal amplitude with a rate of 10 V per minute. The buttons should be polled periodically with a period of 10 ms.
It should be possible to start and stop the control with on-off buttons. Associated with the on-off buttons are status indication lamps.
It should be possible to type in new values of the controller gain K from the terminal (No graphical Swing-interface). The set-up is shown in the figure below.
The overall task is to write a Java program that solves the problem using threads and monitors. Use four public classes: Regul, OpCom, SquareWave, and Buttons, plus a Main class for initialization.
A first step in the design of the real-time problem is to decide which threads that are needed for the application. Some rules of thumb are:
The next step in the design is to identify the critical sections that need to be protected using monitors. Here we will use Java's synchronized methods to achieve the synchronization.
The OpCom thread should update the controller gain K when the user has entered a new value. The controller gain is also needed by the Regul thread. Therefore it is necessary to protect the controller gain using a separate monitor class, ParameterMonitor. This class should have two synchronized access methods, one set method, setK(), and one get method, getK(), i.e.
  public synchronized void setK(double newK);
  public synchronized double getK();
The next item that needs protection is the reference value. It is accessed by both the Regul thread and by the SquareWave thread. Again we use a separate monitor class, ReferenceMonitor with two synchronized access methods:
  public synchronized void setRef(double newRef);
  public synchronized double getRef();
We also need a boolean flag that decides whether the controller should be on or off. The flag is accessed by both the Regul thread and by the Buttons thread that polls the buttons. Let the monitor for this flag be named OnMonitor, and have the following access methods:
  public synchronized void setOn(boolean value);
  public synchronized boolean isOn();
Finally, we need to represent the amplitude of the square-wave reference signal. This value needs to be accessed both by the SquareWave thread and by the Buttons thread. Again we introduce a monitor class, AmplitudeMonitor, with two synchronized access methods:
  public synchronized void setAmp(double newAmp);
  public synchronized double getAmp();
Hence, we need four monitors, each represented as a separate object with synchronized access methods. Instead of using four separate monitors one could instead use a single monitor. However, this would create unnecessary blocking among the threads. For example, the OpCom thread calling setK() would block a call from the SquareWave thread to setRef, which is not necessary from a synchronization point of view.
The next step in the design is to define the public interfaces between the different code modules. Here we will use the public classes Regul, OpCom, SquareWave, and Buttons as code modules. In order to minimize the number of top-level classes, and hence the number of files, we will implement the four monitor classes as internal classes within the top-level module classes.
Since it is quite natural to let the controller gain be the responsibility of the Regul class, we will implement ParameterMonitor as an internal class inside Regul. Quite arbitrarily, we also decide that the ReferenceMonitor and the OnMonitor should be internal classes of Regul. The AmplitudeMonitor, finally, we implement as an internal class of SquareWave.
When encapsulating the monitors as internal classes we need extra methods at the module class level that simply redirect the call to the corresponding monitor access method. However, these redirection methods should not be synchronized. If they are, we can again create situations where the threads block each other in unnecessary ways.
Finally, we decide to implement all our thread classes by inheriting from the Thread class.
Analog and digital input and output are implemented in the classes AnalogIn, AnalogOut, DigitalIn, and DigitalOut in se.lth.control.realtime. The classes are used as in the code example below.
  public class IODemo {
    public static void main(String[] args) {
      AnalogIn yIn = null;
      AnalogOut uOut = null;
      DigitalIn digIn = null;
      DigitalOut digOut = null;

      try {
        yIn = new AnalogIn(1);
        uOut = new AnalogOut(1);
        digIn = new DigitalIn(1);
        digOut = new DigitalOut(1);
      } catch (IOChannelException e) {
        e.printStackTrace();
        System.exit(1);
      }

      try {
        double y = yIn.get();
        uOut.set(0.0);
        digOut.set(true);
        boolean b = digIn.get();
      } catch (IOChannelException e) {
        e.printStackTrace();
      }
    }
  }
During the exercise you should, however, not use the physical IO. Instead you should run against a real-time simulation of a first-order system and you should use a graphical buttons box implemented as a Swing GUI.
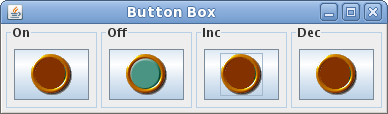
Each button is connected to one digital input. Each indicator lamp is connected to one digital output.
The buttons box is provided by the class Box. (Download Box.java to your current directory. It is not necessary for you to open and study the code of this class.) The class provides six methods that each either returns a subclass to digital input representing a button or returns a subclass to digital output representing an indicator lamp. The implementation of Box is thread-safe and therefore the methods can be called without any monitor protection. The methods are the following:
  public DigitalButtonIn  getOnButtonInput();   // On button input
  public DigitalButtonOut getOnButtonLamp();    // On lamp output
  public DigitalButtonIn  getOffButtonInput();  // Off button input
  public DigitalButtonOut getOffButtonLamp();   // Off lamp output
  public DigitalButtonIn  getIncButtonInput();  // Inc button input
  public DigitalButtonIn  getDecButtonInput();  // Dec button input
DigitalButtonIn and DigitalButtonOut have the same interface as DigitalIn and DigitalOut respectively.
Let Regul manipulate the lamp outputs and Buttons handle the button inputs.
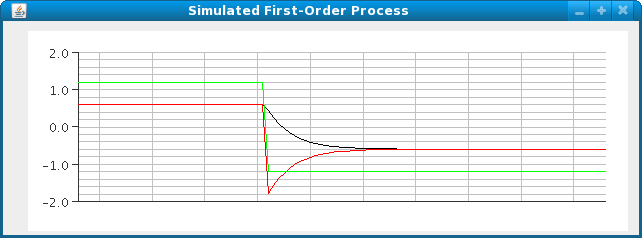
The simulated process is provided by the class FirstOrderProcess (Download FirstOrderProcess.java to your current directory. It is not necessary for you to open and study the code of this class.). This class provides the following methods:
  // i = 0: Returns the AnalogSource for the tank output.
  public AnalogSource getSource(int i);

  // i = 0: Returns the AnalogSink for tank input.
  // i = 1: Returns the AnalogSink for the reference signal.
  public AnalogSink getSink(int i);
AnalogSource and AnalogSink have the same interface as AnalogIn and AnalogOut respectively.
The simulated process is displayed by a window containing a plot of the control signal to the tank (red), the output (level) of the tank (black), and the reference signal of the controller (green).
The public interface to a code module can be defined in different, more or less formal, ways in Java.
In this example we will use the first, informal, approach. The interfaces of our four top level module classes, including their associated internal classes, should be as follows:
In addition to these classes the following Main class should be used to initialize the application.
  public class Main {
    public static void main(String[] args) {
      final int regulPriority   = 8;
      final int buttonsPriority = 7;
      final int squarePriority  = 6;
      final int opcomPriority   = 5;

      Box box = new Box();

      FirstOrderProcess simulatedProcess = new FirstOrderProcess();

      Regul regul = new Regul(regulPriority, box, simulatedProcess);
      OpCom opcom = new OpCom(regul, opcomPriority);
      SquareWave squarewave = new SquareWave(regul, squarePriority);
      Buttons buttons = new Buttons(regul, squarewave, buttonsPriority, box);

      regul.start();
      opcom.start();
      squarewave.start();
      buttons.start();
    }
  }
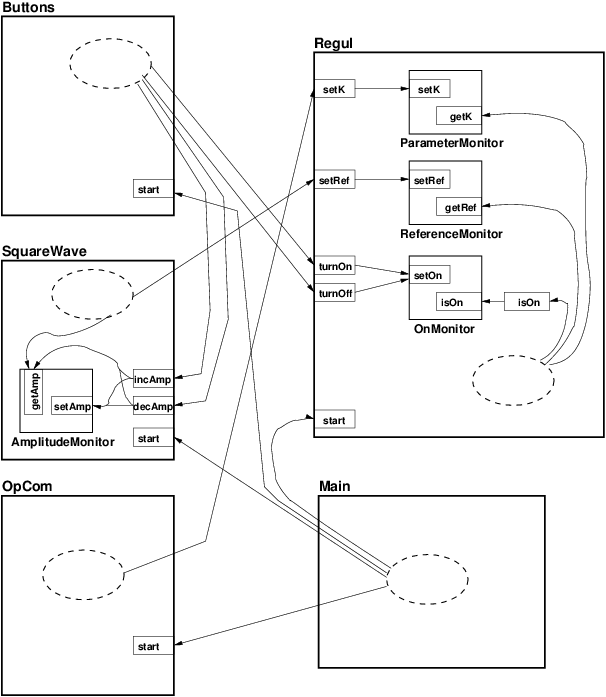
A nice overview is provided if the structure is illustrated graphically. Here each module is represented by a bold rectangle. A monitor inside the module is represented by a rectangle inside the module. Public methods of the module are represented as rectangles that are aligned with the module border. Synchronized methods of the monitor are represented as rectangles that are aligned with the monitor border. Threads are represented as dashed ellipses. The graph for our application is shown below:
import SimEnvironment.*;

public class Buttons extends Thread {
	private Regul regul;
	private SquareWave square;

	// Inputs and outputs
	private DigitalButtonIn onInput;
	private DigitalButtonIn offInput;
	private DigitalButtonIn incInput;
	private DigitalButtonIn decInput;

	// Constructor
	public Buttons(Regul regul, SquareWave square, int priority, Box b) {
		this.regul = regul;
		this.square = square;

		onInput = b.getOnButtonInput();
		offInput = b.getOffButtonInput();
		incInput = b.getIncButtonInput();
		decInput = b.getDecButtonInput();

		setPriority(priority);
	}

	// run method
	public void run() {
		final int h = 10; // period (ms)
		final double delta = 10.0 / (60.0 * 1000.0) * h; // 10V per minute
		try {
			while (!Thread.interrupted()) {
				if (onInput.get()) {
					regul.turnOn();
				}
				if (offInput.get()) {
					regul.turnOff();
				}
				if (incInput.get()) {
					square.incAmp(delta);
				}
				if (decInput.get()) {
					square.decAmp(delta);
				}
				Thread.sleep(h);
			}
		} catch (InterruptedException e) {
			// Requested to stop
		}
		System.out.println("Buttons stopped.");
	}
}
public class SquareWave extends Thread {
	private Regul regul;
	private int sign = 1;

	private AmplitudeMonitor ampMon = new AmplitudeMonitor();

	// Internal AmplitudeMonitor class
	// Constructor not necessary
	private class AmplitudeMonitor {
		private double amp = 0.0;

		// Synchronized access methods. The amplitude should always be non-negative.
		public synchronized double getAmp() {
			return amp;
		}
		public synchronized void setAmp(double amp) {
			this.amp = Math.max(amp, 0);
		}
	}

	// Constructor
	public SquareWave(Regul regul, int priority) {
		this.regul = regul;
		setPriority(priority);
	}

	// Public methods to decrease and increase the amplitude by delta. Called from Buttons
	// Should be synchronized on ampMon. Should also call the setRef method in Regul
	public void incAmp(double delta) {
		synchronized (ampMon) {
			ampMon.setAmp(ampMon.getAmp() + delta);
		}
		setRef();
	}

	public void decAmp(double delta) {
		incAmp(-delta);
	}

	private void setRef() {
		regul.setRef(sign*ampMon.getAmp());
	}

	// run method
	public void run() {
		final long h = 10000; // period (ms)
		try {
			while (!Thread.interrupted()) {
				sign = -sign;
				setRef();
				Thread.sleep(h);
			}
		} catch (InterruptedException e) {
			// Requested to stop
		}
		System.out.println("SquareWave stopped.");
	}
}
  BufferedReader in = new BufferedReader(new InputStreamReader(System.in));
  ...
  System.out.print("K = ");
  try {
    regul.setK(Double.parseDouble(in.readLine()));
  } catch (IOException e) {
    e.printStackTrace();
  } catch (NumberFormatException e) {
    System.out.println("Not a number.");
  }
import java.io.BufferedReader;
import java.io.IOException;
import java.io.InputStreamReader;

public class OpCom extends Thread {
	private Regul regul;

	// Constructor
	public OpCom(Regul regul, int priority) {
		this.regul = regul;
		setPriority(priority);
	}

	// run method
	public void run() {
		BufferedReader in = new BufferedReader(new InputStreamReader(System.in));
		while (!Thread.interrupted()) {
			System.out.print("K = ");
			try {
				regul.setK(Double.parseDouble(in.readLine()));
			} catch (IOException e) {
				e.printStackTrace();
			} catch (NumberFormatException e) {
				System.out.println("Not a number.");
			}
		}
		System.out.println("OpCom stopped.");
	}
}
import SimEnvironment.*;

public class Regul extends Thread {
	// Analog inputs and outputs
	private AnalogSource yIn;
	private AnalogSink uOut;
	private AnalogSink rOut;

	// Box lamp outputs
	private DigitalButtonOut onButtonLamp;
	private DigitalButtonOut offButtonLamp;

	// Internal Monitors
	private ParameterMonitor paramMon = new ParameterMonitor();
	private ReferenceMonitor refMon = new ReferenceMonitor();
	private OnMonitor onMon = new OnMonitor();

	// Constructor
	// Here the internal monitor objects should be created and
	// the inputs and outputs should be initialized.
	public Regul(int priority, Box b, FirstOrderProcess proc) {
		yIn = proc.getSource(0);
		uOut = proc.getSink(0);
		rOut = proc.getSink(1);
		onButtonLamp = b.getOnButtonLamp();
		offButtonLamp = b.getOffButtonLamp();
		updateLamps();
		setPriority(priority);
	}

	// Public method to set K. Should not be synchronized.
	public void setK(double K) {
		paramMon.setK(K);
	}

	// Public method to set the reference. Should not be synchronized.
	public void setRef(double ref) {
		refMon.setRef(ref);
	}

	// Method to check if the controller  is on. Should be private
	// since it is only called from Regul itself.
	private boolean isOn() {
		return onMon.isOn();
	}

	// Public methods to turn off and on the controller
	// Should not be synchronized. Should update the button lamps
	public void turnOff() {
		onMon.setOn(false);
		updateLamps();
	}

	public void turnOn() {
		onMon.setOn(true);
		updateLamps();
	}

	private void updateLamps() {
		boolean isOn = isOn();
		onButtonLamp.set(isOn);
		offButtonLamp.set(!isOn);
	}

	// Class definition for internal ParameterMonitor
	private class ParameterMonitor {
		private double K = 1.0;

		// Synchronized access methods. K should always be non-negative.
		public synchronized double getK() {
			return K;
		}

		public synchronized void setK(double K) {
			if (K >= 0) {
				this.K = K;
			} else {
				System.out.println("Illegal K value ignored: " + K);
			}
		}
	}

	// Class definition for internal ReferenceMonitor
	private class ReferenceMonitor {
		private double ref = 0.0;

		// Synchronized access methods
		public synchronized double getRef() {
			return ref;
		}

		public synchronized void setRef(double ref) {
			this.ref = ref;
		}
	}

	// Class definition for internal OnMonitor
	private class OnMonitor {
		private boolean on = false;

		// Synchronized access methods
		public synchronized boolean isOn() {
			return on;
		}

		public synchronized void setOn(boolean on) {
			this.on = on;
		}
	}

	// Run method
	public void run() {
		final long h = 100; // period (ms)
		try {
			while (!Thread.interrupted()) {
				// Get inputs
				double y = yIn.get();
				double r = refMon.getRef();
				double K = paramMon.getK();

				// Compute control signal
				double u = 0.0;
				if (isOn()) {
					u = K * (r - y); // P controller
				}

				// Set outputs
				uOut.set(u);
				rOut.set(r);

				Thread.sleep(h);
			}
		} catch (InterruptedException e) {
			// Requested to stop
		}
		System.out.println("Regul stopped.");
	}
}
  > javac -classpath .:virtualsimulator.jar *.java
  > java -classpath .:virtualsimulator.jar Main
Try with different values of the gain K. Does the result correspond to what you remember from the basic course in control (Reglerteknik AK)? What about the stationary error?
This exercise is primarily intended for those students who have not taken the Real-Time Programming course.
  public class RingBuffer {
    public RingBuffer(int bufSize);
    public synchronized Object get();
    public synchronized void put(Object o);
  }
Implement the ring buffer as an array, a counter that contains the current number of elements in the buffer and two indexing variables that tell where data should be read and written respectively.
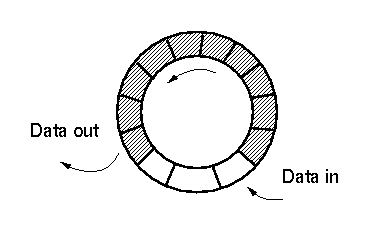
Represent the buffer as an array of Object references
private Object[] elements;
Use increment modulus the size of the buffer when updating an indexing variable, i.e.
nextRead = (nextRead + 1) % bufSize;
public class RingBuffer {
	private final int bufSize;
	private Object[] elements;
	private int nextRead = 0;
	private int nextWrite = 0;
	private int curSize = 0;

	public RingBuffer(int bufSize) {
		this.bufSize = bufSize;
		elements = new Object[bufSize];
	}

	public synchronized Object get() throws InterruptedException {
		while (curSize == 0) {
			wait();
		}
		Object ret = elements[nextRead];
		elements[nextRead] = null;
		nextRead = (nextRead + 1) % bufSize;
		curSize--;
		notifyAll();
		return ret;
	}

	public synchronized void put(Object o) throws InterruptedException {
		while (curSize == bufSize) {
			wait();
		}
		elements[nextWrite] = o;
		nextWrite = (nextWrite + 1) % bufSize;
		curSize++;
		notifyAll();
	}
}
import se.lth.control.realtime.ConditionVariable;
import se.lth.control.realtime.Semaphore;

public class RingBufferWithSemaphore {
	private final int bufSize;
	private Object[] elements;
	private int nextRead = 0;
	private int nextWrite = 0;
	private int curSize = 0;

	private Semaphore sem;
	private ConditionVariable nonEmpty;
	private ConditionVariable nonFull;

	public RingBufferWithSemaphore(int bufSize) {
		this.bufSize = bufSize;
		elements = new Object[bufSize];

		sem = new Semaphore(1);
		nonEmpty = new ConditionVariable(sem);
		nonFull = new ConditionVariable(sem);
	}

	public Object get() {
		sem.take();
		while (curSize == 0) {
			nonEmpty.cvWait();
		}
		Object ret = elements[nextRead];
		elements[nextRead] = null;
		nextRead = (nextRead + 1) % bufSize;
		curSize--;
		nonFull.cvNotifyAll();
		sem.give();
		return ret;
	}

	public void put(Object o) {
		sem.take();
		while (curSize == bufSize) {
			nonFull.cvWait();
		}
		elements[nextWrite] = o;
		nextWrite = (nextWrite + 1) % bufSize;
		curSize++;
		nonEmpty.cvNotifyAll();
		sem.give();
	}
}