If you are still not ready with Exercise 3, please finish that first.
The aim of exercise four is:
The exercise does not pretend to give any general Swing tutorial. Only the specific things needed in order to develop the type of graphical interfaces that you need in the projects will be covered.
In order to use Swing you must import the necessary packages. In most cases these are
  import javax.swing.*;
  import javax.swing.event.*;
  import java.awt.*;
  import java.awt.event.*;
Every program with a Swing GUI must contain at least one top-level Swing container. A top-level Swing container provides the support that Swing components need to perform their painting and event handling. There are three top-level Swing containers: JFrame, JDialog, and (for applets) JApplet. In the course we will only use JFrame. Each JFrame object implements a single main window.
The code needed to create and display a window is
  JFrame frame = new JFrame("PID GUI");
  ...
  frame.pack();
  frame.setVisible(true);
The default behavior when the close button is clicked is to just hide the window. To exit the program instead, the following code is used:
frame.setDefaultCloseOperation(JFrame.EXIT_ON_CLOSE);
This is quite brutal. If you want to perform some application specific action before shut-down, e.g., turning off the control in a graceful manner you should use the following code instead:
  frame.setDefaultCloseOperation(JFrame.DISPOSE_ON_CLOSE);

  frame.addWindowListener(new WindowAdapter() {
    public void windowClosed(WindowEvent e) {
      executeClosingDownActions();
    }
  });
The last part is an event listener which you will learn more about soon. This listener is implemented as an anonymous class which is the most common way in Java.
A Swing based GUI application always contains three different components:
The frame is a top-level container. The panel is an intermediate container. Its only purpose is to simplify the positioning of the atomic components. The atomic components either present some information to the user or receive input from the user.
Every top-level container contains an intermediate container known as its content pane. The content pane contains all of the visible components in the window's GUI.
To add a component to a container you use one of the add methods. The add methods have at least one argument – the component to be added. Sometimes an additional argument is required to provide layout information. For example, the last line of the following code sample specifies that the panel should be in the center of its container (the content pane).
The following code adds a button and a label to a panel, and the panel to the content pane:
  JFrame frame = new JFrame(...);
  JButton button = new JButton(...);
  JLabel label = new JLabel(...);
  JPanel pane = new JPanel();
  pane.add(button, ...);
  pane.add(label, ...);
  frame.getContentPane().add(pane, BorderLayout.CENTER);
A JPanel is itself a component and can therefore be added to other panels. This is commonly used to build up more complex interfaces. See, e.g., the interface to the Sinus example.
Layout management is the process of determining the size and position of components. By default, each container has a layout manager – an object that performs layout management for the components within the container. Components can provide size and alignment hints to layout managers, but layout managers have the final say on the size and position of those components.
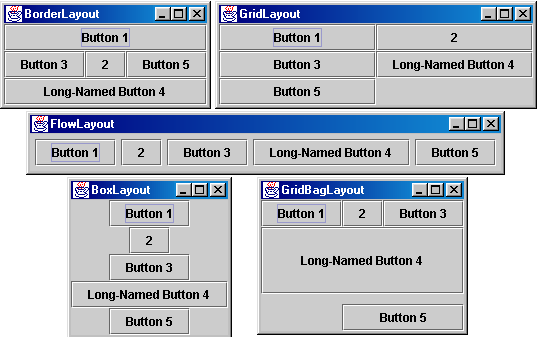
The Java platform supplies five commonly used layout managers: BorderLayout, BoxLayout, FlowLayout, GridBagLayout, and GridLayout.
All JPanel objects use a FlowLayout by default, whereas content panes (the main containers in JApplet, JDialog, and JFrame objects) use BorderLayout by default. As a rule, the only time you have to think about layout managers is when you create a JPanel or add components to a content pane. If you don't like the default layout manager that a panel or content pane uses, you can change it to a different one. Just invoke the container's setLayout method. For example, here's the code that makes a panel use BorderLayout:
  JPanel pane = new JPanel();
  pane.setLayout(new BorderLayout());
When you add components to a panel or a content pane, the arguments you specify to the add method depend on the layout manager that the panel or content pane is using. Check the layout manager's API documentation for details.
BorderLayout is the default layout manager for every content pane. The content pane is the main container in all frames, applets, and dialogs. A BorderLayout has five areas available to hold components: north, south, east, west, and center. All extra space is placed in the center area.
The BoxLayout class puts components in a single row or column. This class respects the components' requested maximum sizes and also lets you align components.
FlowLayout is the default layout manager for every JPanel. This layout manager simply lays out components from left to right, starting new rows, if necessary.
GridLayout simply makes a bunch of components equal in size and displays them in the requested number of rows and columns.
GridBagLayout aligns components by placing them within a grid of cells, allowing some components to span more than one cell. The rows in the grid aren't necessarily all the same height; similarly, grid columns can have different widths.
GroupLayout is the most sophisticated, flexible layout manager the Java platform provides. With this layout manager you specify how the components are placed relative to each other, both vertically and horizontally, as well as minimum, preferred, and maximum sizes of each component. It was originally developed for GUI building tools but works very well also for hand written code.
       import javax.swing.*;
       import java.awt.*;
       import java.awt.event.*;

       public class SimpleGUI {
  private String name;

  public SimpleGUI(String name) {
    this.name = name;
  }

  public void initializeGUI() {
    JFrame frame = new JFrame(name);
    JPanel pane = new JPanel();
    JButton button = new JButton("Press");
    JButton quitbutton = new JButton("QUIT");
    JLabel label = new JLabel(" ");

    pane.setLayout(new BorderLayout());
    pane.add(button, BorderLayout.SOUTH);
    pane.add(quitbutton, BorderLayout.NORTH);
    pane.add(label, BorderLayout.CENTER);

    frame.getContentPane().add(pane, BorderLayout.CENTER);
    frame.pack();
    frame.setVisible(true);
  }

  public static void main(String[] args) {
    SimpleGUI g = new SimpleGUI("A GUI!");
    g.initializeGUI();
  }
       }
Every time the user types a character or pushes a mouse button, an event occurs. Any object can be notified of the event. All it has to do is to implement the appropriate interface and be registered as an event listener on the appropriate event source. Swing components can generate many kinds of events. Here are a few examples:
| Act that results in the event | Listener type |
|---|---|
| User clicks a button, presses Return while typing in a text field, or chooses a menu item. | ActionListener |
| User closes a frame, e.g. the main window. | WindowListener |
| User presses a mouse button while the cursor is over a component. | MouseListener |
| User moves the mouse over a component. | MouseMotionListener |
Each event is represented by an object that gives information about the event and identifies the event source. Event sources are typically components, but other kinds of objects can also be event sources. Each event source can have multiple listeners registered on it. Conversely, a single listener can register with multiple event sources.
Every event handler requires three parts of code:
public class MyClass implements ActionListener {
someComponent.addActionListener(instanceOfMyClass);
  public void actionPerformed(ActionEvent e) {
    // Code that reacts to the action
  }
Let's investigate a typical event handling scenario by looking at how buttons (JButton) handle mouse clicks. To detect when the user clicks an on-screen button (or does the keyboard equivalent), a program must have an object that implements the ActionListener interface. The program must register this object as an action listener on the button (the event source), using the addActionListener method. When the user clicks the on-screen button, the button fires an action event. This results in the invocation of the action listener's actionPerformed method (the only method in the ActionListener interface). The single argument to the method is an ActionEvent object that gives information about the event and its source.

The listener's event-handling code is executed by a special thread, the event-dispatcher thread. This thread is always present in a Java application that uses Swing.
In principle one can use any object as an event listener, even the component object itself. However, it is very common to use anonymous event listeners, i.e., implement them as anonymous classes, see the code below:
  JButton button = new JButton("Test Button");
  button.addActionListener(new ActionListener() {
    public  void actionPerformed(ActionEvent e) {
      handleButtonClick();
    }
  });
Here handleButtonClick is the method that is called to perform an application-dependent action when the action is performed.
       import javax.swing.*;
       import java.awt.*;
       import java.awt.event.*;

       public class SimpleGUI {
  private String name;

  public SimpleGUI(String name) {
    this.name = name;
  }

  public void initializeGUI() {
    JFrame frame = new JFrame(name);
    JPanel pane = new JPanel();
    JButton button = new JButton("Press");
    JButton quitbutton = new JButton("QUIT");
    JLabel label = new JLabel(" ");

    pane.setLayout(new BorderLayout());
    pane.add(button, BorderLayout.SOUTH);
    pane.add(quitbutton, BorderLayout.NORTH);
    pane.add(label, BorderLayout.CENTER);

    button.addActionListener(new ActionListener() {
      public void actionPerformed(ActionEvent e) {
        label.setText("Hello!");
      }
    });
    quitbutton.addActionListener(new ActionListener() {
      public void actionPerformed(ActionEvent e) {
        System.out.println(Thread.currentThread().getPriority());
        System.exit(0);
      }
    });
    frame.getContentPane().add(pane, BorderLayout.CENTER);
    frame.pack();
    frame.setVisible(true);
  }

  public static void main(String[] args) {
    SimpleGUI g = new SimpleGUI("A GUI!");
    g.initializeGUI();
  }
       }
A JSlider can be used to let the user enter numeric values bounded by a minimum and maximum value. Here is the code needed to implement a slider.
  slider = new JSlider(0, 100, 50);
  slider.setPaintTicks(true);
  slider.setMajorTickSpacing(10);
  slider.setMinorTickSpacing(5);
  slider.setLabelTable(slider.createStandardLabels(10));
  slider.setPaintLabels(true);
  slider.addChangeListener(new ChangeListener() {
    public void stateChanged(ChangeEvent e) {
      changeValue();
    }
  });

  ...

  private void changeValue() {
    if (!slider.getValueIsAdjusting()) {
      doSomething(slider.getValue());
    }
  }
To handle the slider a ChangeListener is needed. To avoid making changes while the user moves the slider, the test on getValueIsAdjusting is used.
The class DoubleField is a local class in se.lth.control that extends the more general JTextField class. It only accepts text that can be parsed to numbers of type double, and within a range that may be specified. While the user is changing the text in the field, the text is in a special color (red by default), and the user can then commit the number with the ENTER key. If the number is legal, the internal value is changed to this value, and the text color is changed to another color (black by default). If the number is illegal, the internal value is not changed, and the text in the field is changed back to a representation of the internal value. (Currently DoubleField only allows you to enter decimal numbers using . (dot) as the decimal sign. However, the decimal number is, somewhat, inconsequently displayed as a , (comma).)
The constructor is
public DoubleField(int positions, int numDigits);
Useful methods are
  public double getValue();
  public void setValue(double value);
  public void setMinimum(double min);
  public void setMaximum(double max);
We recommend that you use DoubleField as soon as you want to create a GUI where the user enter values, e.g., controller parameters, by typing.
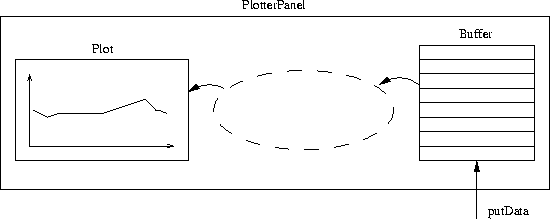
PlotterPanel is a local class in se.lth.control.plot that extends JPanel and can be used to plot signals in real time. The class contains a bounded FIFO-buffer where data is put. An internal thread takes the data from the buffer and displays it in the GUI. It is possible to have several channels into each PlotterPanel so that several signals can be displayed in the same plot.
The constructor is
public PlotterPanel(int channels, int threadPriority);
Some useful methods are
  public void setXAxis(double range, int divTicks, int divGrid);
  public void setYAxis(double range, double bottom, int divTicks,
                       int divGrid);
  public void putData(double x, double y1, double y2, ...);
  public void start(); // Starts internal thread
When you implement a GUI for your projects in this course, it is often useful to use a certain structure. We recommend that you
Swing components are, with a few exceptions, not thread-safe. Therefore they may only be accessed by one thread at a time, generally only by the event-dispatching thread. This is expressed by the so called single-thread rule that says
Rule: Once a Swing component has been realized, all code that might affect or depend on the state of that component should be executed in the context of the event-dispatching thread.
A Swing component is realized by having one of the following methods invoked on its top-level container: setVisible(true) or pack().
There are a few exceptions to the rule.
This is marked specially in the Swing API specification. The PlotterPanel class is, e.g., thread-safe.
In earlier versions of Java it was considered OK to construct a Swing GUI by, e.g., the main thread. However, in Java 7 this recommendation has been changed. Now also the construction of the GUI is no longer thread-safe.
Most post initialization GUI work naturally occurs in the event-dispatching thread. Once the GUI is visible, most programs are driven by events, such as button actions or mouse clicks, which are always handled in the event-dispatching thread.
However, some programs need to perform nonevent-driven GUI work after the GUI is visible. Here is an example.
For example, suppose that a server program can get requests from other programs that might be running on different machines. These requests can come at any time, and they result in one of the server's methods being invoked in a possibly unknown thread. How can that method update the GUI? By executing the GUI-update code in the event- dispatching thread. This is quite common in control applications where we often want the Regul thread to execute actions that change the appearance of the user interface. For, example, the Regul thread may decide that a mode change should be performed and that the GUI should change accordingly.
The SwingUtilities class provides two methods that can be used to execute code in the event-dispatching thread.
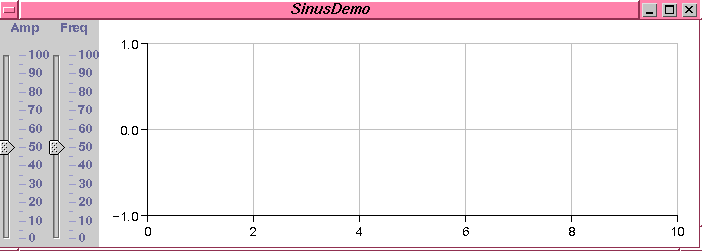
The Sinus Swing example contains an example of this. The method resetAmplitude() is provided by Opcom to allow the Sinus (Regul) thread to update a slider, see below:
  public void resetAmplitude(final double amp) {
    // New runnable is created to update ampSlider
    Runnable updateSlider = new Runnable() {
      public void run() {
        int temp = (int)(amp  * 100);
        ampSlider.setValue(temp);
      }
    };

    // Runnable sent to event-dispatching thread for execution
    SwingUtilities.invokeLater(updateSlider);
  }
Although the Runnable has a run method, it will not be executed as a thread, i.e., it will not be started. Instead the event-dispatching thread will call the run method as an ordinary method, once it has serviced all pending Swing events.
In Laboratory 1 you will take your ball and beam program from Exercise 3, modify it slightly and run against a real ball and beam process. The GUI for this is provided in the file OpCom.java. The GUI provides the following components: